World Edit – 1.7.10 → 1.17.1

WorldEdit is a very powerful tool that will allow you to make big changes on your map in multiplayer but also on your single player game thanks to Forge. It is in line with other creation tools such as MC Edit and World Painter which have become essential.
Even if it is very widespread some features of the plugin and the minecraft mod are unknown to the general public, I will try as much as possible to talk about all the commands that exist.
At the end of the article you will find all the instructions to install and configure the plugin on server or solo, as well as the permissions file if you use the plugin. Let’s take a look at the features of WorldEdit right now and there are many !
Regions
WorldEdit‘s regions system relies on selecting an area on which editing commands will be active, so first you need to learn how to select an area correctly.
Selecting a region
There are only two types of selections: cuboidal and polygonal. The latter is reserved for more experienced users because it is less convenient, so let’s start with the cuboidal selection.
Most of the commands described here can be undone with the //undo command, so don’t hesitate to use it if what you wanted to do is not the result you got.
The cuboidal selection consists in creating a selection block by designating two points which will be two opposite vertices in the cube (which is in fact not always a cube). Here is a little diagram to help you understand :
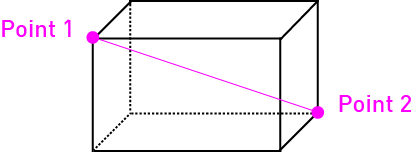
First of all you will need the WorldEdit magic wand, which by default is the wooden axe, which you can obtain by typing the following command : //wand. With this tool in hand, simply left click on a block to make it point 1 and right click on another to make it point 2.
Otherwise there are other, simpler but less intuitive ways of selecting an area :
- the commands //pos1 and //pos2 define as points 1 and 2 the block corresponding to your feet (i.e. the one just above the cube you are walking on)
- the commands //hpos1 and //hpos2 define the blocks you point with your viewer as points 1 and 2
- the command //chunk defines the chunk you are on as a selection (a chunk is 16×16 by 128 in height)
Adjusting the selection
If your selection is not perfectly the one you want (this is usually noticed when the intended modification did not work), you can adjust it in different ways :
//expand : this command simply expands your selection, to use it there are several ways.
- //expand <size> [direction] : will expand the selection by the desired size in the desired direction (N (north), S (souht) ,W (west), E (east), U (up) and D (down)), if you don’t put a direction the expansion will be done directly in the direction you are looking (except for the top and bottom)
- //expand <size of the selected side> <size on the other side> [direction] : works like the previous one except you can directly choose to expand the selection on two opposite sides
- //expand green : expands the area to the full height of the sky to the bedrock
//contract : this command does the opposite effect of expand by reducing the selection.
- //contract <size> [direction] : will contract the selection by the desired size in the desired direction (N (north), S (souht) ,W (west), E (east), U (up) and D (down)), if you don’t put a direction the contraction will be done directly in the direction you are looking (except for the top and bottom)
- //contract <size of the selected side> <size on the other side> [direction] : works like the previous one except you can directly choose to contract the selection from two opposite sides
//shift : this command how much to expand and contract by shifting your selection “cube” without moving any blocks! It is simply used by doing : //shift <size> [direction]
Selection information
WorldEdit allows you to get information about the selection area by using a few commands :
//size : simply gives you the size of your selection by counting the air “blocks” (useful for checking that a selection is not too large)
//count <block> : counts the number of blocks chosen in the selection
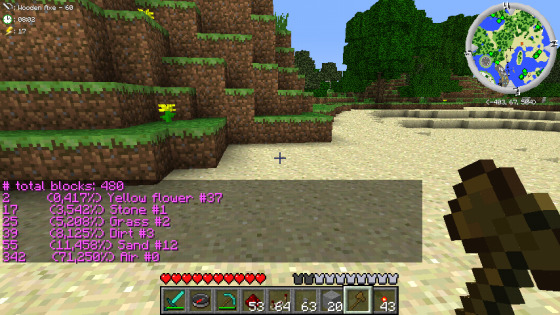
//distr : shows the distribution of blocks in the selection, for example :
Polygon selection
If the area you want to select is quite squiggly you can use the polygonal selection mode :
- //sel poly : switches to polygonal selection mode, left click with the wooden axe to select the first point and right click to select the following points
- //sel cuboid : go back to cuboidal selection mode
Operations on regions
Now that you have selected the area you need, we will see how to act on this selection with some commands that will be very useful :
//set <block> : the whole selection is replaced by the selected block
//replace <list of blocks> <block> : the blocks of the first list are all replaced by the selected block, if you want to replace several types of blocks separate them by commas (example : //replace stone,grass,dirt sand -> will replace all stone, grass and dirt blocks into sand). If you don’t specify a block to replace, all blocks in the selection except air will be replaced.
//walls <bloc> : allows you to create walls all around the selection with the chosen block
//outline <bloc> : same as the previous one but with a floor and ceiling (basically it materializes the edges selected region)
//overlay <bloc> : will lay the chosen block on top of every block in the selection, regardless of the shape of the terrain (useful if you want to put grass back on a hill without distorting it for example)
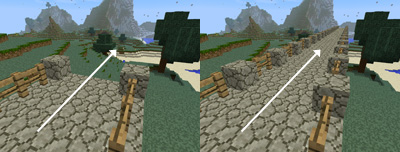
//stack <number> [direction] : will copy in the chosen direction (where you are looking or N (north), S (south) ,W (west), E (east), up and down) the selection a desired number of times desired, e.g. this bridge was created simply from a small portion and the command
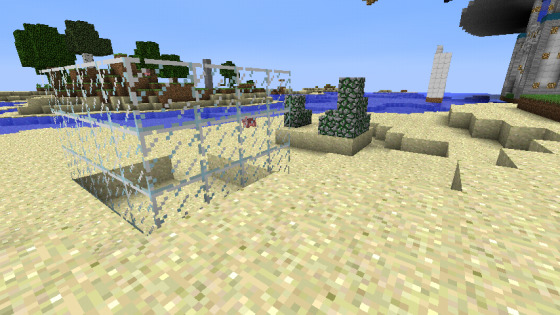
//move [direction] [block in replacement] : allows you to move the selection by a defined number of squares in the desired direction (same as //stack). If you choose a replacement block, the void created by the move will be filled by the chosen block, here is an example (bad) or I moved the ruins with the sand base and I filled the void created in with glass :
//smooth [number of iterations] : this command is very useful because it allows you to “smooth” the region by rounding the corners with an algorithm. If you put a number of iterations the algorithm will execute “rounding” the terrains by running the algorithm a number of times, for a better result. Note: for this command to be optimal, select a larger area containing air. The //expand will do the trick.
//regen : this command will allow you to regenerate the terrain as it was originally, each time the result will be the same. Be careful if you have used a terrain generation software other than the original one, you may have surprising results.
Paper press
Thanks to World Edit you will be able to copy and paste selected areas very easily, there is not much to do:
Copy/Paste
//copy : the whole selection is copied and added to the Clipboard. Be careful ! The selection is copied relative to you! For example if you want to change the location of the region and you are standing 10 blocks away from it pointing north, you will have to think that when you paste you will have to stand 10 blocks away and look north so that what you are copying is in the right direction and in the right place.
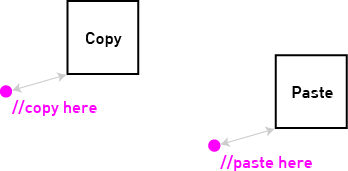
//cut [list of blocks] : same effect as the previous one except that what you copy is deleted. If you want you can put a list of blocks that will remain, for example grass and earth in order not to distort the landscape
//paste [-a] : copies the selection relative to you. If you put -a all the blocks except the air will be copied
Rotate the selection
//rotate [angle] : rotates the copied selection by an angle which is necessarily a multiple of 90 degrees (90, 180 or 270). The rotation is done around the point where the selection has been copied, if you want to rotate the selection you just have to stand in the middle to copy it
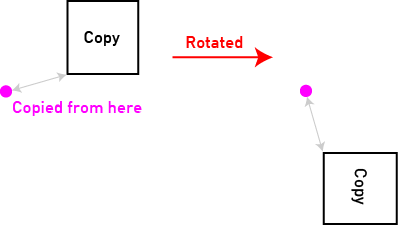
//flip [-p] [direction] : “flips” the selection as if you were looking in a mirror, according to a plane in the middle of it. For the directions you can choose n, s, e, w, up and down or just look in the right direction (does not work for up & down). If you put -p as an argument, the plane of symmetry will be relative to you.
Saving and more
WorldEdit simply allows you to save and load schematic files, a format used by McEdit and many other programs (including those for redstone, pixel art, music, …). The files will be stored in a folder named Schematic on your server/.minecraft folder. If you don’t see it or if you don’t know where to create it save anything: it will be created automatically and you will know where to place your schematics to import.
//save : saves the selection that has been copied into the schematic folder with the chosen name
//load : loads the specified schematic into the clipboard, all you have to do is copy it
//clearclipboard : simply empties the clipboard, which saves some memory
Generate
WorldEdit will also allow you to generate different types of things simply :
//cyl <block> <ray> [height] : generates a solid cylinder with the desired parameters. If you don’t set a height you will get a disk (height 1)
//hcyl <block> <ray> [height] : generates an empty cylinder or a circle
//sphere <block> <ray> [mounted ?] : creates a full sphere with the desired parameters, so that you are in the middle of it. If you want your position to be the bottom of the sphere put “yes” as the last argument
//hsphere <block> <ray> [mounted ?] : same as the previous one but the sphere is hollow.
/fo/forestgen <size> [type] [density] : creates a forest around you of the desired size. If you select a tree type you have a choice of regular (normal trees), big (large normal trees), sequoia and tallsequoia (small and large dark trees), birch (white trees), pine (dark wood pine), randsequoia (random mix of large and small sequoia) and rand (mix of all types). The density represents the percentage of trunks on the ground, for example on an area of size 100 if you put 8 there will be 8 trunks on the ground. Be careful not to set too high a value or it will be particularly ugly, in the game the density is naturally 5. Be careful! If you are solo this command is not undoable !
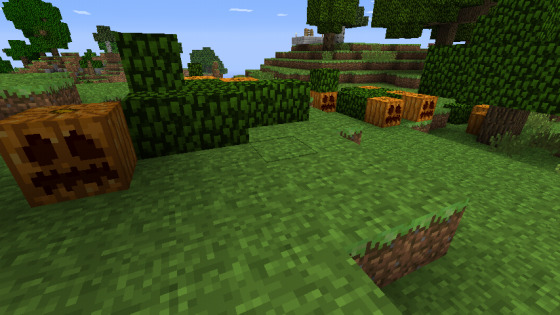
pumpkins [size] : generates a “pumpkin forest”, not very useful but quite nice visually
Utilities
WorldEdit also has some useful functions for terraforming
//fillpit <block> <ray> [depth] : fills holes directly without having to place a bunch of blocks. To do this put yourself in the middle of the hole and select the radius and possibly the depth (useless with water). In this way it is possible to create pools or fill a hole simply
//fillr <block> <ray> : same as the previous one but automatically fills all the blocks of the hole located under your feet (useful if you don’t know precisely how deep it is)
///drain <ray> : reverse effect of the previous one, this command allows you to drain a pool of water or lava. Stand in the middle or right next to it at the same height as the surface for the command to work. It’s the same as typing “Replacenear <rayon> 8,9 air”, un bon raccourcit !“, a good shortcut !
//fixwater <ray> : removes all water currents in the selected radius, creating a flat expanse. You can also type “Replacenear <ray> 8,9 8“
/fixlava <ray> : same but with lava, the “long” command becomes “Replacenear <ray> 10,11 10“
/removeabove <size> [hauteur] : removes all blocks above you on the chosen height, useful to remove “towers” fates to observe the surroundings for example
/removebelow <size> [depth] : same but below you
/removenear <block> <size> : removes all chosen blocks in an area around you
/replacenear <size> <block to be replaced> <replacement block> : like the previous one, replaces selected blocks with others in an area around you
/snow <ray> : simulates a snowfall in a selected radius, a layer of snow will cover all blocks where possible and water will be changed to ice
/thaw <ray> : reverse effect, melt snow and ice in the chosen radius
/butcher <ray> : kill all mobs located in the chosen radius
/ex [radius]> : extinguishes fire in an area around you. By default the radius is 40 if you don’t specify anything
// : activates the ” Super Pickaxe ” which destroys all the blocks (even the bedrock) in one shot (be careful it goes fast !). There are three modes for the super pickaxe:
- /sp area <ray> : all blocks of the same type as the first one typed are destroyed also in a square around you
- /sp recur <ray> : all blocks of the same type as the first typed are destroyed in the chosen radius only if they are adjacent to a block that has been deleted
- /sp single : returns to basic mode, only hit blocks are broken
/tree [type] : the object you are holding becomes a tree tool of the chosen type (the same as for forest generation), right click on the ground will create one.
//repl <block> : the object you hold becomes a tool that replaces the blocks you hit with the one you want.
/none : disables the two previous commands (the tool becomes normal again)
/cycler : recycles the “value” of the block you click on, for example, changes the type of wood, the color of wool, the shape of the rail, …
/br sphere <block> [ray] : creates spheres where you aim.
/br cyl <block> [ray] [height] : ditto creating cylinders
/br clipboard [-a] : copies the clipboard where you are looking. If you specify “-a”, the air will not be copied
/brush smooth [size] [number of iterations] : same effect as //smooth but at distance
Moving around
Latest WorldEdit features : a set of commands to move automatically, but also a compass ! In multiplayer or solo the compass will allow you to move faster by teleporting to the point you are aiming at with the left click (same effect as the /jumpto command) and by crossing walls with the right click (same effect as /thru) . Otherwise there are also some commands :
/unstuck : if you are stuck, this will free you (very frequent when generating spheres or cylinders)
/ascend : takes you up to the nearest block above you
/descend : takes you down to the nearest block below you
/ceil [space] : takes you up to the ceiling of the room you are in, i.e. a glass block will be placed on top of you so that you just pass between the ceiling and it and you are teleported to it. If you want more space above your head you can specify a value in addition
/up <height> : raises you to the desired height, your feet will rest on a glass block
Data value syntaxes
Under this barbaric name hides in fact, not a command, but a way to use some, for example, how to make panels appear where it is written something or mobs spawners to choose from !
Panel text : you just have to separate the lines by vertical bars (key of 6) and to put “_” instead of spaces : for example : //set sign|Line1|Line2_Text|Line3
Type of mob spawner : use a vertical bar followed by the name of the mob, for example //set mobspawner|creeper
Note block score : use the vertical bar followed by the number of clicks corresponding to the score (between 0 and 24)
Other data value : use the id or the name of the item followed by “:” and the chosen value, for example crops:6 is almost ripe wheat. You can find on the official Minecraft wiki all the possible data values associated to the blocks but we can note for example that it’s possible to change the orientation of an oven or the shape of a rail
Patterns : here is something very useful, the patterns. Concretely it is possible with the commands set, replace, overlay, fill and fillr not to select a single block but a list of blocks with a fixed distribution, an example is better than a long speech so : //set 5%diamondore,95%stone will create for example a cube with 95% stone and 5% diamond ores. If you want an equitable distribution it is useless to put percentages
Masks : for brushes and other commands where you replace blocks you can select a mask which is a list of blocks that acts either as a whitelist (separated by commas, only these blocks will be affected e.g. grass,stone) or as a blacklist (precede the list with an exclamation mark, all blocks except these will be affected e.g. !air,stone)
World Edit updates
Discover the latest changes made to the mod.
World Edit 7
Many changes have been made to WorldEdit 7, offering exciting new possibilities when editing your world or creating plugins. Many new features have been added since the last time.
What’s New in World Edit 7 – 11/06/2019
Block Parsing
This is perhaps the most important change in WorldEdit 7, as it affects how the player interacts with blocks. Instead of using block identifiers in commands, the new method is to use the block key. These keys take the form of namespace:block , where namespace is minecraft for any vanilla block. For example, grass blocks are referenced by minecraft: grass_block. Since most use cases involve Minecraft blocks, this part is optional. This means that simply using grass_block will work fine.
Since block metadata has been removed from the game, we have implemented a system to reference block states using the official Minecraft format. For example, the definition of a snowy grass block is as follows, grass_block [snowy = true]. This sets the snowy property to true. A list of block properties is available on the Minecraft wiki. If a block contains multiple properties, you can set them with a comma separator, such as lever[powered=false,facing=north,face=ceiling]. If you do not want to specify all properties, you can omit them and the default value will be used.
Another feature of the new block parser is the ability to set properties without touching the type or to change the type without touching the properties. If you use ^ instead of the type, it will set the properties without changing the type. For example, ^[waterlogged = true] will set all applicable blocks to their waterlogged variant. If you use ^ before the type without the properties, it will set the type without changing the properties. For example, ^brick_slab on a group of waterlogged slabs will set them to brick but retain the waterlogged state. If you include both, for example in ^brick_slab[waterlogged=false], the non-waterlogged brick tiles will be defined, while retaining whether they are placed on top or bottom.
For legacy reasons, it is still possible to use numeric block identifiers and the old “colors for wool” parser, such as red for red wool. This is not supported and is only a temporary measure to help people migrate.
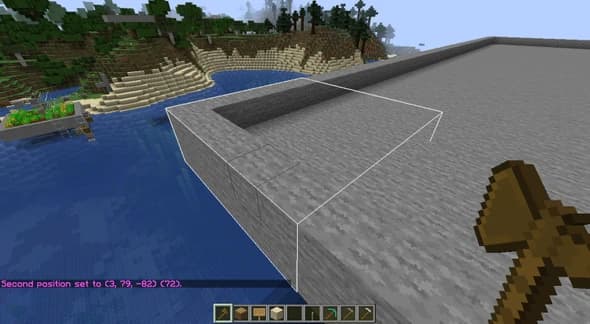
Server selection interface
Many people use the unofficial client addon known as WorldEditCUI. Due to recent changes to Minecraft, we were able to add a limited version of this to WorldEdit itself.
It has the limitation of requiring the user to be in create mode and only supports cuboid selections smaller than 32x32x32. These are limitations in the way we display selections, and cannot be fixed without a client mod.
If you do not wish to use this feature, it can be toggled per user with the //drawsel command or disabled entirely in the configuration.
Schematics
Due to changes in version 1.13, the MCEdit schematic format could no longer be used. For this reason we switched to the Sponge schematics format. This has some important advantages, such as better support for mods, as well as support for biomes. To copy biomes, use //copy-b, and to paste biomes, use //paste-b. This is similar to using -e when copying and pasting entities.
Another change with regard to schemas is that plugins can now add new schema formats and can also intelligently retrieve the format of a schema file. This should make it possible to use smaller or more specific formats with WorldEdit, without the need to add them to the main plugin.
Tags
Minecraft 1.13 has added a system for tagging groups of blocks, items or fluids. Some of these are provided by Minecraft and listed on the Minecraft wiki. Otherwise they can be added in data packs.
World Edit allows you to use them as masks, to modify only the blocks corresponding to the tag. These are specified using the syntax ##namespace:tagname. The namespace rules apply as for block parsing, which means you don’t need to specify it if it’s just minecraft. An example of using this in a mask is //gmask ##wool. This mask would just match wool blocks. If a mod adds new wool blocks, they can add them to the wool label and it will also match.
Tags can also be used as a pattern, acting in the same way as random patterns. The content of the tag is applied in the same way to the whole selected area. If the * character is used before the tag name, all block states will be applied, not just the default states. For example, //set ##*logs would also define all states for all logs, not just all log types.
Download Word Edit
Mod version (solo)
For Forge
For Fabric
Download Fabric, then :
Multiplayer version (bukkit)
DOWNLOAD THE BUKKIT PLUGIN
✅ Source and other versions
Install World Edit
Now that you have downloaded it, find out how to install World Edit on your Minecraft solo or on your server.
Mod version (solo)
To install World Edit and play it solo you will need Forge, follow the steps :
- Download Forge and install it
- Drag the downloaded World Edit files to the right folder
- Launch the Minecraft launcher and play
See : How to install a Minecraft mod
Multi version (bukkit)
- Drag it to your plugins folder on your server (eventually create it if needed)
- Restart the server
- You can see here for the configuration and permissions, but in general there is nothing to change
Questions and Answers about WorldEdit
❓ World Edit is what ?
It’s an easy to use mod / plugin for Minecraft, allowing you to edit your map via commands.
👥 Is it possible to use World Edit in single and multiplayer ?
Yes, you can use WE in solo (via a Forge compatible mod) and in multi (via a Bukkit compatible plugin).
🤷 I can’t use Word Edit on my solo world, why ?
It is essential that the controls are enabled in-game for you to use the mod. Please remember to enable them!
🖥️ What are the basic commands in World Edit ?
Test the basic commands with the following actions : Look at a block not too far away and type /jumpto, stand under a tree and type /ascend, at the top of the tree type /descend.
💿 With which versions of Minecraft is World Edit available ?
World Edit is available for versions: 1.6.4, 1.7.10, 1.8.9, 1.9.4, 1.10.2, 1.11.2, 1.12.2, 1.13.2, 1.14.4, 1.15.2, 1.16.5 and 1.17.1.